How to design and use MoClo in budding yeast - part 2
Constructing a custom CRISPR/Cas9 plasmid using Golden Gate assemblies for budding yeast transformations.
This article is part of our technical series, designed to provide the bioscience community with in-depth knowledge and insight from experts working at the Earlham Institute.
Dr Anna Rogers is a Postdoctoral Researcher in the Conrad Nieduszynski Group, working on finding replication fork pause sites and the elements that affect fork pausing in budding yeast.
Anna obtained her Ph.D. in Molecular Biology and Biochemistry at Wesleyan University (Connecticut, USA), studying the role of histone proteins in chromosome structure and RNA transcription in budding yeast.
In this series of articles, I’m walking you through the process of using a Golden Gate cloning method to make useful intermediates for the construction of new yeast strains.
In part I, we engineered our healing fragment. Now, it’s time to design our CIRSPR/Cas9 plasmid with custom guides.
Most people working with yeast will understand the value of using a CRISPR/Cas9-based approach to Saccharomyces cerevisiae transformation. These types of transformations allow for more efficient and markerless integrations into the genome.
In this article I’m going to show you how to use a system from the Ellis lab to make custom CRISPR/Cas9 plasmids, which can contain up to 10 guides, using the pMYT095 plasmid (reference and links for obtaining plasmid and kit).
In addition to its ability to hold multiple guides in a single plasmid, this system also allows for a (relatively) quick yeast marker change by a follow-up Golden Gate reaction.
This article will take you through the design and production of custom CRISPR/Cas9 plasmids using the pMYT095 plasmid.
I’m going to use a guide designed to work with the homology arms from pMYT084 (see part I), but will also explain resources I use for finding guides to other genomic regions.
There are few options for finding guides and my favourites are:
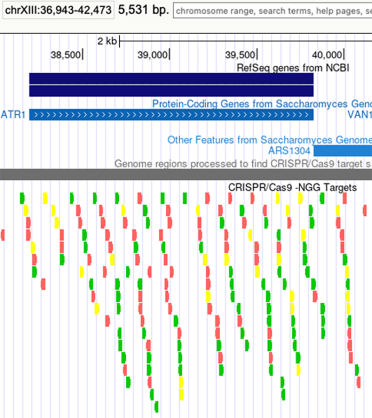
In the UCSC browser you can open a CRISPR/Cas9 -NGG Targets track and view options targeting your gene of interest.
The guides are rated by various tests that can be seen by hovering over each guide and the best guides are coloured green, while the worst are in red.
Here is an example for ATR1:
To use a similar feature in Benchling, first download your region of interest. Then, on the sidebar, there’s a target symbol - this is how you can find the guides in the region.
Below is an example from the same ATR1 gene as above but, this time, I have sorted by On-Target Score in my target region:

When I design guides, I use both of these tools to find the guide that’ll work best for my target region. I find that Benchling is better for non-gene regions and they have an easy sort feature for your region of interest.
In the case of our example, continuing from part I and using parts from the MYT kit, we already have a guide, which you can find in the Supporting Information of the paper.
The Locus 10 guide is TACAACGCCAACCTAAAGAG and targets the middle of Chr XVI:588839-589860.
To design our custom CRISPR/Cas9 we will turn again to Benchling. To start, download the sequence of pMYT095, then open the assembly wizard in Benchling and select Golden Gate assembly.
In the Overall Assembly box, select ‘settings’ - indicated by the cog wheel:

The settings we want are:
Pre-recognition site length = 3bp
Pre-recognition site bases = TTT
Min Tm for binding region = 57˚C
Min length for binding region = 19 bp
Max Tm diff for primer pairs = 20˚C
TypeIIS Enzyme = BsaI
Set the backbone to pMYT095 and make sure that BsaI is still selected.
Now click ‘Insert’ to add an insert. In pMYT095 select the sgRNA-NL-tCCC region:
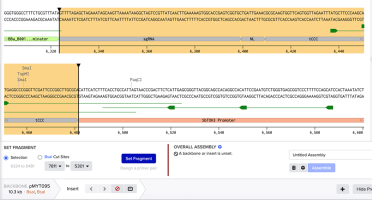
With those three regions selected, use the Selection option (not the BsaI Cut Sites) to set a fragment.
Then we choose ‘Add Spacer After’ to add our choice of DNA between the backbone and insert:
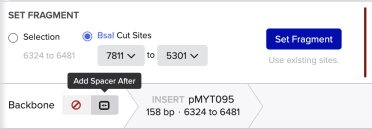
Using the format below, enter the name of your gRNA and the gRNA in the 5’ to 3’ direction - with the PAM site at the 3’ end - and click save:

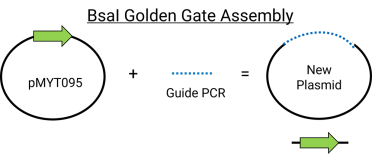
At this point, the assembly is complete. To save the new plasmid assembly and the primers needed to make the gRNA fragment, click ‘Assemble’ and save to a folder.
The above steps are how to make a single guide contained in pMYT095, but we could add up to 10 guides to a single plasmid. To do this, follow these steps after saving the first guide:

The primers that we made use the pMYT095 as a template and make small products, generally about 200 bp in length.
After performing the PCR, and confirming there is product on a gel, do a clean-up (I usually do a Qiagen MinElute PCR Purification).
Since PCR products are not whole plasmids, I’m following the recommendations of adding a 2:1 molar ratio of insert:vector (see the NEB kits BsaI and BsmBI). I used the NEBioCalculator to estimate the quantity of PCR product to add to my 75 ng of vector.

With these ratios we can perform a BsaI assembly and E. coli transformation as done in part I of this series.
With the assembly we performed, the correct plasmid would lose the GFP (in pMYT095).
This means, along with the antibiotic selection, we can look for cream coloured colonies to increase our chances of picking successful colonies for further testing.
The colour should be easy to see but, if it hasn’t developed on the plate when you pick colonies, it’ll be very obvious when cultures are made for Minipreps.
Here’s an example of the expected colour difference:
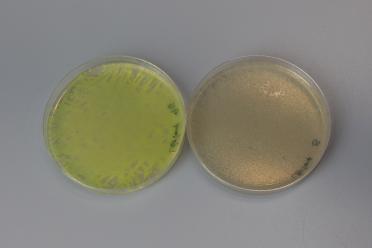
The left petri dish shows an unsuccessful assembly, with presence of GFP, and the right shows a successful assembly with the loss of GFP.
As in part I, I would isolate a few cream coloured colonies and perform diagnostic digests to confirm the expected size of insert.
Since we introduced a PCR product into this Golden Gate assembly, I’d recommend Sanger sequencing to confirm the guide is as expected.
I find this plasmid - with or without guides - doesn’t produce a lot of plasmid by Miniprep, usually between 40-80 ng/µl in 50 µl from 3 ml of culture. This hasn’t created any problems with downstream yeast transformations.
Another useful feature of using this system based around pMYT095 is the yeast selection marker is easily changed for one that works with your strains.
The starting plasmid has a URA3 marker but this site has BbsI sites on either side. The BbsI sites and other plasmids in the kit allow for a Golden Gate assembly marker swap.
Here are the other yeast markers available for this system:
| Plasmid | Yeast marker |
|---|---|
| pMYT030 | LEU2 |
| pMYT031 | HIS3 |
| pMYT032 | TRP1 |
| pMYT033 | MET17 |
| pMYT034 | LYS2 |
| pMYT035 | KanR |
| pMYT036 | NatR |
| pMYT037 | HygR |
| pMYT038 | ZeoR |
In the final part of this series (part III), we’ll use the tools constructed from part I and II to do a yeast transformation and make our strain!