How to design and use MoClo in budding yeast - part 3
Transforming budding yeast with Golden Gate assembled healing fragments and custom CRISPR/Cas9 plasmid.
This article is part of our technical series, designed to provide the bioscience community with in-depth knowledge and insight from experts working at the Earlham Institute.
Dr Anna Rogers is a Postdoctoral Researcher in the Conrad Nieduszynski Group, working on finding replication fork pause sites and the elements that affect fork pausing in budding yeast.
Anna obtained her Ph.D. in Molecular Biology and Biochemistry at Wesleyan University (Connecticut, USA), studying the role of histone proteins in chromosome structure and RNA transcription in budding yeast.
In this series of articles we’ve been using Golden Gate cloning to engineer the parts needed to create a new Saccharomyces cerevisiae strain that will be integrated into the genome in a scarless and markerless transformation.
In this third and final article, I’m going to share how to use the plasmids from part I and II to complete a yeast transformation.
For those reading this article who are experienced yeast geneticists, this will all be very familiar. To those who are new to working with budding yeast, this final part can serve as a guide to get you going in yeast strain construction.
To do a yeast transformation, we need to prepare the materials.
Our custom CRISPR/Cas9 plasmid just needs to be extracted so we have enough for the number of transformations performed. The integration plasmid needs to be NotI digested and cleaned up before transformation.
We don’t want to bring the plasmid backbone into the yeast, so we do a digest to make a healing fragment that ends with the homology arms.

While setting up the NotI digest, it’s a good time to consider how much you plan on adding to the transformation. I’ve used a minimum of 1 µg of whole plasmid, but find that if I use 2-3 µg I have more transformed colonies to choose from when confirming strains.
After the NotI digest, I run about 200 ng on a gel to confirm a complete digest (see image in part I). I also clean up our digested fragment with an appropriate kit I usually do a Qiagen QiaQuick cleanup.
At this point, follow your favourite yeast transformation protocol (for example, see this article or this protocol) and introduce the healing fragment and CRISPR/Cas9 plasmid. I typically use 1-3 µg of healing fragment and 0.5-1 µg of CRISPR/Cas9 plasmid per transformation.
For controls, I like to do a CRISPR/Cas9 only as a negative control and a pMYT095 only as a positive control (this gives beautiful pink colonies). The CRISPR/Cas9 plasmid only control will show us how many colonies come from a NHEJ repair instead of healing fragment integration. The pMYT095 control is useful to see how efficient the transformation was using the URA3 selection.
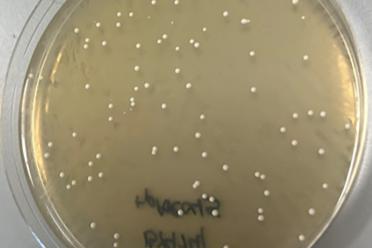
When plating your transformed yeast, match the plate to the yeast marker in your custom CRISPR/Cas9 plasmid. Here is an example of a transformation I plated on SDC-ura media:

If there aren’t enough colonies to test, I find repeating the transformation with more healing fragment DNA and more CRISPR/Cas9 plasmid helps.
Once there are enough colonies to test, patch colonies to the same selective plate used for the transformation. Once the patches have grown, perform a colony PCR to test for successful integration of the healing fragment (example colony PCR protocol).
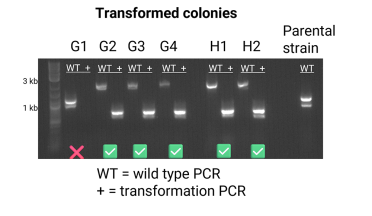
I design two PCRs for each integration site. The first PCR confirms the site of the starting target locus and has primers that sit outside the homology arms (see below). The second PCR uses one of the primers from the first PCR and is then paired with a primer that will only bind to part of the integrated healing fragment.

PCR expected results:
Example PCR with successful and unsuccessful integrations:

In this example, we can see the parental strain is positive for the wild type PCR. The failed colony (G1) only has a band for the wild type PCR, suggesting that the healing fragment did not integrate at the target locus.
The successful integrations have bands for the transformation PCR. We also see a band for the wild type PCR, but it is shifted up, suggesting the healing fragment was inserted into the target locus. These large bands can be hard to achieve in colony PCR, but sometimes happen!
If needed, confirm by Sanger sequencing.
At this point you will know which strains have worked. It is important to remember that they will still have the CRISPR/Cas9 plasmid present, so it may be worth restreaking your new strains without selection to allow for the plasmid to leave the yeast. Alternatively, leave a note with the strain genotype description that it may still contain this plasmid.
So there you have it! Hopefully, you’ve found the three parts easy to follow and you’re ready to start incorporating Golden Gate assemblies into your work.
I have used multiple methods to make new yeast strains, but using Golden Gate cloning with these kits has made complex strain construction faster and more efficient.
With my own work, I’ve made strains, tested them, and then redesigned them to make my perfect strain. It has been great to be able to reuse parts and sub in pieces to adjust my final strain.
If you have any questions or feedback - be that positive or negative - please email communications@earlham.ac.uk.
If you are interested in creating tens or hundreds of plasmids, you may want to get in touch with the Earlham Biofoundry who have a range of platforms and expertise for automating many of these processes.
Good luck!
We acknowledge funding from the Biotechnology and Biological Sciences Research Council (BBSRC), part of UK Research and Innovation, Core Capability Grant BB/CCG2220/1 and response mode grant BB/W006014/1
Catch up on the previous two parts in this series below.

Designing and building your integration plasmid for Golden Gate assemblies and transformation into Saccharomyces cerevisiae

Design and build your custom CRISPR/Cas9 plasmid using Golden Gate assemblies for budding yeast transformations