How to design and use MoClo in budding yeast - part 1
Designing and building your integration plasmid for Golden Gate assemblies and transformation into budding yeast.
This article is part of our technical series, designed to provide the bioscience community with in-depth knowledge and insight from experts working at the Earlham Institute.
Dr Anna Rogers is a Postdoctoral Researcher in the Conrad Nieduszynski Group, working on finding replication fork pause sites and the elements that affect fork pausing in budding yeast.
Anna obtained her Ph.D. in Molecular Biology and Biochemistry at Wesleyan University (Connecticut, USA), studying the role of histone proteins in chromosome structure and RNA transcription in budding yeast.
Maybe you’ve read one of the papers on Golden Gate assemblies, such as Lee et al, but need practical guidance on how to use these tools for your own research?
If so, this three-part series can start you on the path of using the Golden Gate cloning method to make useful intermediates to construct the Saccharomyces cerevisiae strain you need.
This first article will walk you through engineering your healing fragment for yeast transformation. In part two, we’ll design the custom guide, and the final article will run through the yeast transformation with the system we’ve built.
I’ve done many yeast transformations in the past where I’ve easily knocked out genes but struggled to make point mutations and add tags to my protein of interest. With this method, almost all my plasmids have been as expected and my complex yeast transformations have also seen high success rates - even without a selectable marker.
The Yeast MoClo and MYT kits allow for efficient, flexible, and marker-free integration of precharacterized parts and custom parts.
Any kits required will be linked throughout, and there’s a list of reference papers at the end. But one tool I would suggest using is Benchling, a free website where you can view and download plasmids and reference genomes, design primers, find restriction enzyme sites, and (most importantly) perform virtual Golden Gate assemblies.
Let’s get started!
To start, we need to have a plan; which gene, which protomer, and where to integrate in the yeast genome are all questions to be answered. I’m using the example of the fluorescent protein Venus under a strong promoter (pTDH3) on Chromosome XVI (Integration locus 10 from the MYT kit).
The integration of Venus requires us to assemble some parts into a plasmid, with the figure below showing all the parts needed for our final integration plasmid - needed for our assembly.

This plasmid will eventually be digested with NotI to include only the homology arms and region between the homology arms for integration into the yeast genome (more on that in part 3 of this series).
Our test case requires a two-part assembly. First, we need to assemble our transcriptional unit (BsaI assembly).
| Plasmid Name | Plasmid Contents / Purpose | MoClo Part |
|---|---|---|
| pYTK002 | ConLS, starting connector | 1 |
| pYTK009 | pTDH3, promoter | 2 |
| pYTK033 | Venus, gene | 3 |
| pYTK051 | tENO1, terminator | 4 |
| pYTK072 | ConRE, ending connector | 5 |
| pYTK095 | Plasmid backbone, origin, AmpR | 6-7-8 |
|
Next, we need to take our newly-made plasmid and pair it with homology arms (BsmBI assembly): |
||
| Plasmid Name | Plasmid Contents / Purpose | MoClo Part |
| New plasmid | ConLS, pTDH3-Venus-tENO1, ConRE | 1-2-3-4-5 |
| pMYT084 | Plasmid backbone, homology arms to locus 10, origin, KanR | 6-7-8 |
This is a simple design, but there are a lot of options:
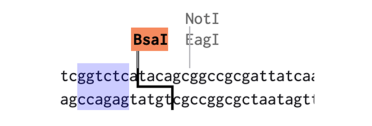
The Golden Gate assemblies make use of type II restriction enzymes. Type II restriction enzymes like BsaI and BsmBI have a recognition site, but cut away from the site. This means the plasmid made by the assembly no longer contains the recognition sites. In the example below, the BsaI recognition site is highlighted in blue, but the cut site leaves a 4 bp overhang next to the recognition site:
To see if our planned assembly will work, we can do a virtual assembly in Benchling. This is especially useful when you spend time making custom parts for your work. For our example assembly, we start by downloading the plasmids listed into Benchling.
Bsal assembly
Benchling’s assembly wizard can be used to put together the plasmids listed above (see table) and check that the assembly works:

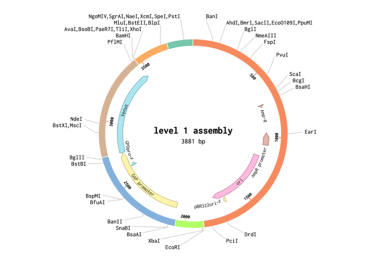
Start by adding pYTK095 as the backbone and select the appropriate enzyme, in this case BsaI, and then add the next parts in order as shown above.
The final transformation plasmid can be visualised as well.
BsmBII assembly
Now the connector-promoter-gene-terminator-connector has been assembled, we can assemble the final plasmid with the homology arms needed for yeast transformation:

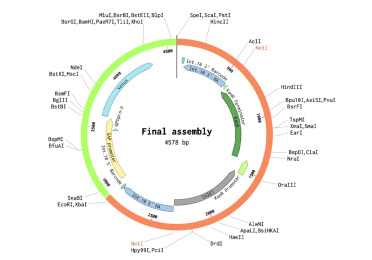
As with the BsaI assembly, start by adding the backbone plasmid pMYT084 and select BsmBII as the enzyme, before finally adding the plasmid we made in the previous step.
The final transformation plasmid can be visualised as well.
Now we know they should work, we can prepare everything to perform the assemblies. Isolate all plasmids needed for the assembly, perform any PCRs for custom parts, and clean up these fragments. I followed the recommendations in the protocols associated with the NEB kits (BsaI and BsmBI).
We have had success with custom mixes where we add:
0.5 µl of the type II restriction enzyme
0.5 µl T4 DNA ligase
1.0 µl T4 DNA ligase buffer
(water and plasmids/fragments to a total volume of 10 µl)
Assembly reaction:
[37˚C* 1 minute, 16˚C 1 min] for 30-60 cycles, followed by 5 minutes at 60˚C.
*Change this temperature for the specific type II restriction enzyme
E. coli transformation:
Transform a portion of the assembly reaction into competent E. coli. The antibiotic added to your LB plates should be appropriate for the plasmid you are trying to assemble.
With the two assemblies we performed, the correct plasmid would lose either a GFP (in pYTK095) or an mScarlet (in pMYT084). This means, along with the antibiotic selection, we can also look for cream coloured colonies to increase our chances of picking successful colonies for further testing.
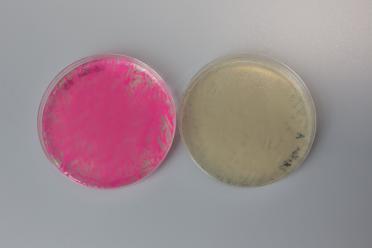
An unsuccessful assembly on the left, showing presence of mScarlet, and a successful assembly on the right, showing a loss of mScarlet.
Select some plasmids to test. On Benchling, you can do a virtual digest to do a quick first pass to find the correct plasmid. After your digest, you can sequence through the important part of the transformation plasmid. Below is an example of a diagnostic digest I have done in the past:
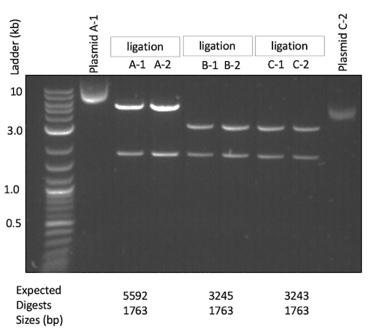
To test my final integration plasmid, I often do NotI digests to confirm the backbone and the fragment that will become the healing fragment of the yeast transformation. This is what we can see above - all tested isolates have the 1763 bp backbone and their particular fragment that will be the healing fragment in the yeast transformation. In the image below, I have indicated where the NotI sites are and where these two fragments come from:

In the next article, we will design a CRISPR/Cas9 plasmid to use with our newly-constructed healing fragment.
Lee ME, DeLoache WC, Cervantes B, Dueber JE. A Highly Characterized Yeast Toolkit for Modular, Multipart Assembly. ACS Synth Biol. 2015 Sep 18;4(9):975-86. doi: 10.1021/sb500366v. Epub 2015 May 1. PMID: 25871405. https://www.addgene.org/kits/moclo-ytk/
Shaw WM, Khalil AS, Ellis T. A Multiplex MoClo Toolkit for Extensive and Flexible Engineering of Saccharomyces cerevisiae. ACS Synth Biol. 2023 Nov 17;12(11):3393-3405. doi: 10.1021/acssynbio.3c00423. Epub 2023 Nov 6. PMID: 37930278; PMCID: PMC10661031. https://www.addgene.org/kits/ellis-myt/